> ## Documentation Index
> Fetch the complete documentation index at: https://docs.noimosai.com/llms.txt
> Use this file to discover all available pages before exploring further.
# Manage Customers, Segments, and Events
> Learn about customer information and activity records that agents use to decide who receives a message and when.
## Overview
Agents use customer data to decide who receives which message and when. This page explains the differences between customers, segments, and events, and how to prepare them for campaigns.
The following three tabs on the `Customer list` page display the core customer data.
| Tab | What it displays |
| --------- | ------------------------------------------------------------------------------------------ |
| Customers | Imported customers and the details for each person |
| Segments | Saved segments and where they are used |
| Events | Received actions, information recorded with each action, and the most recent received time |
## Import Customer Data
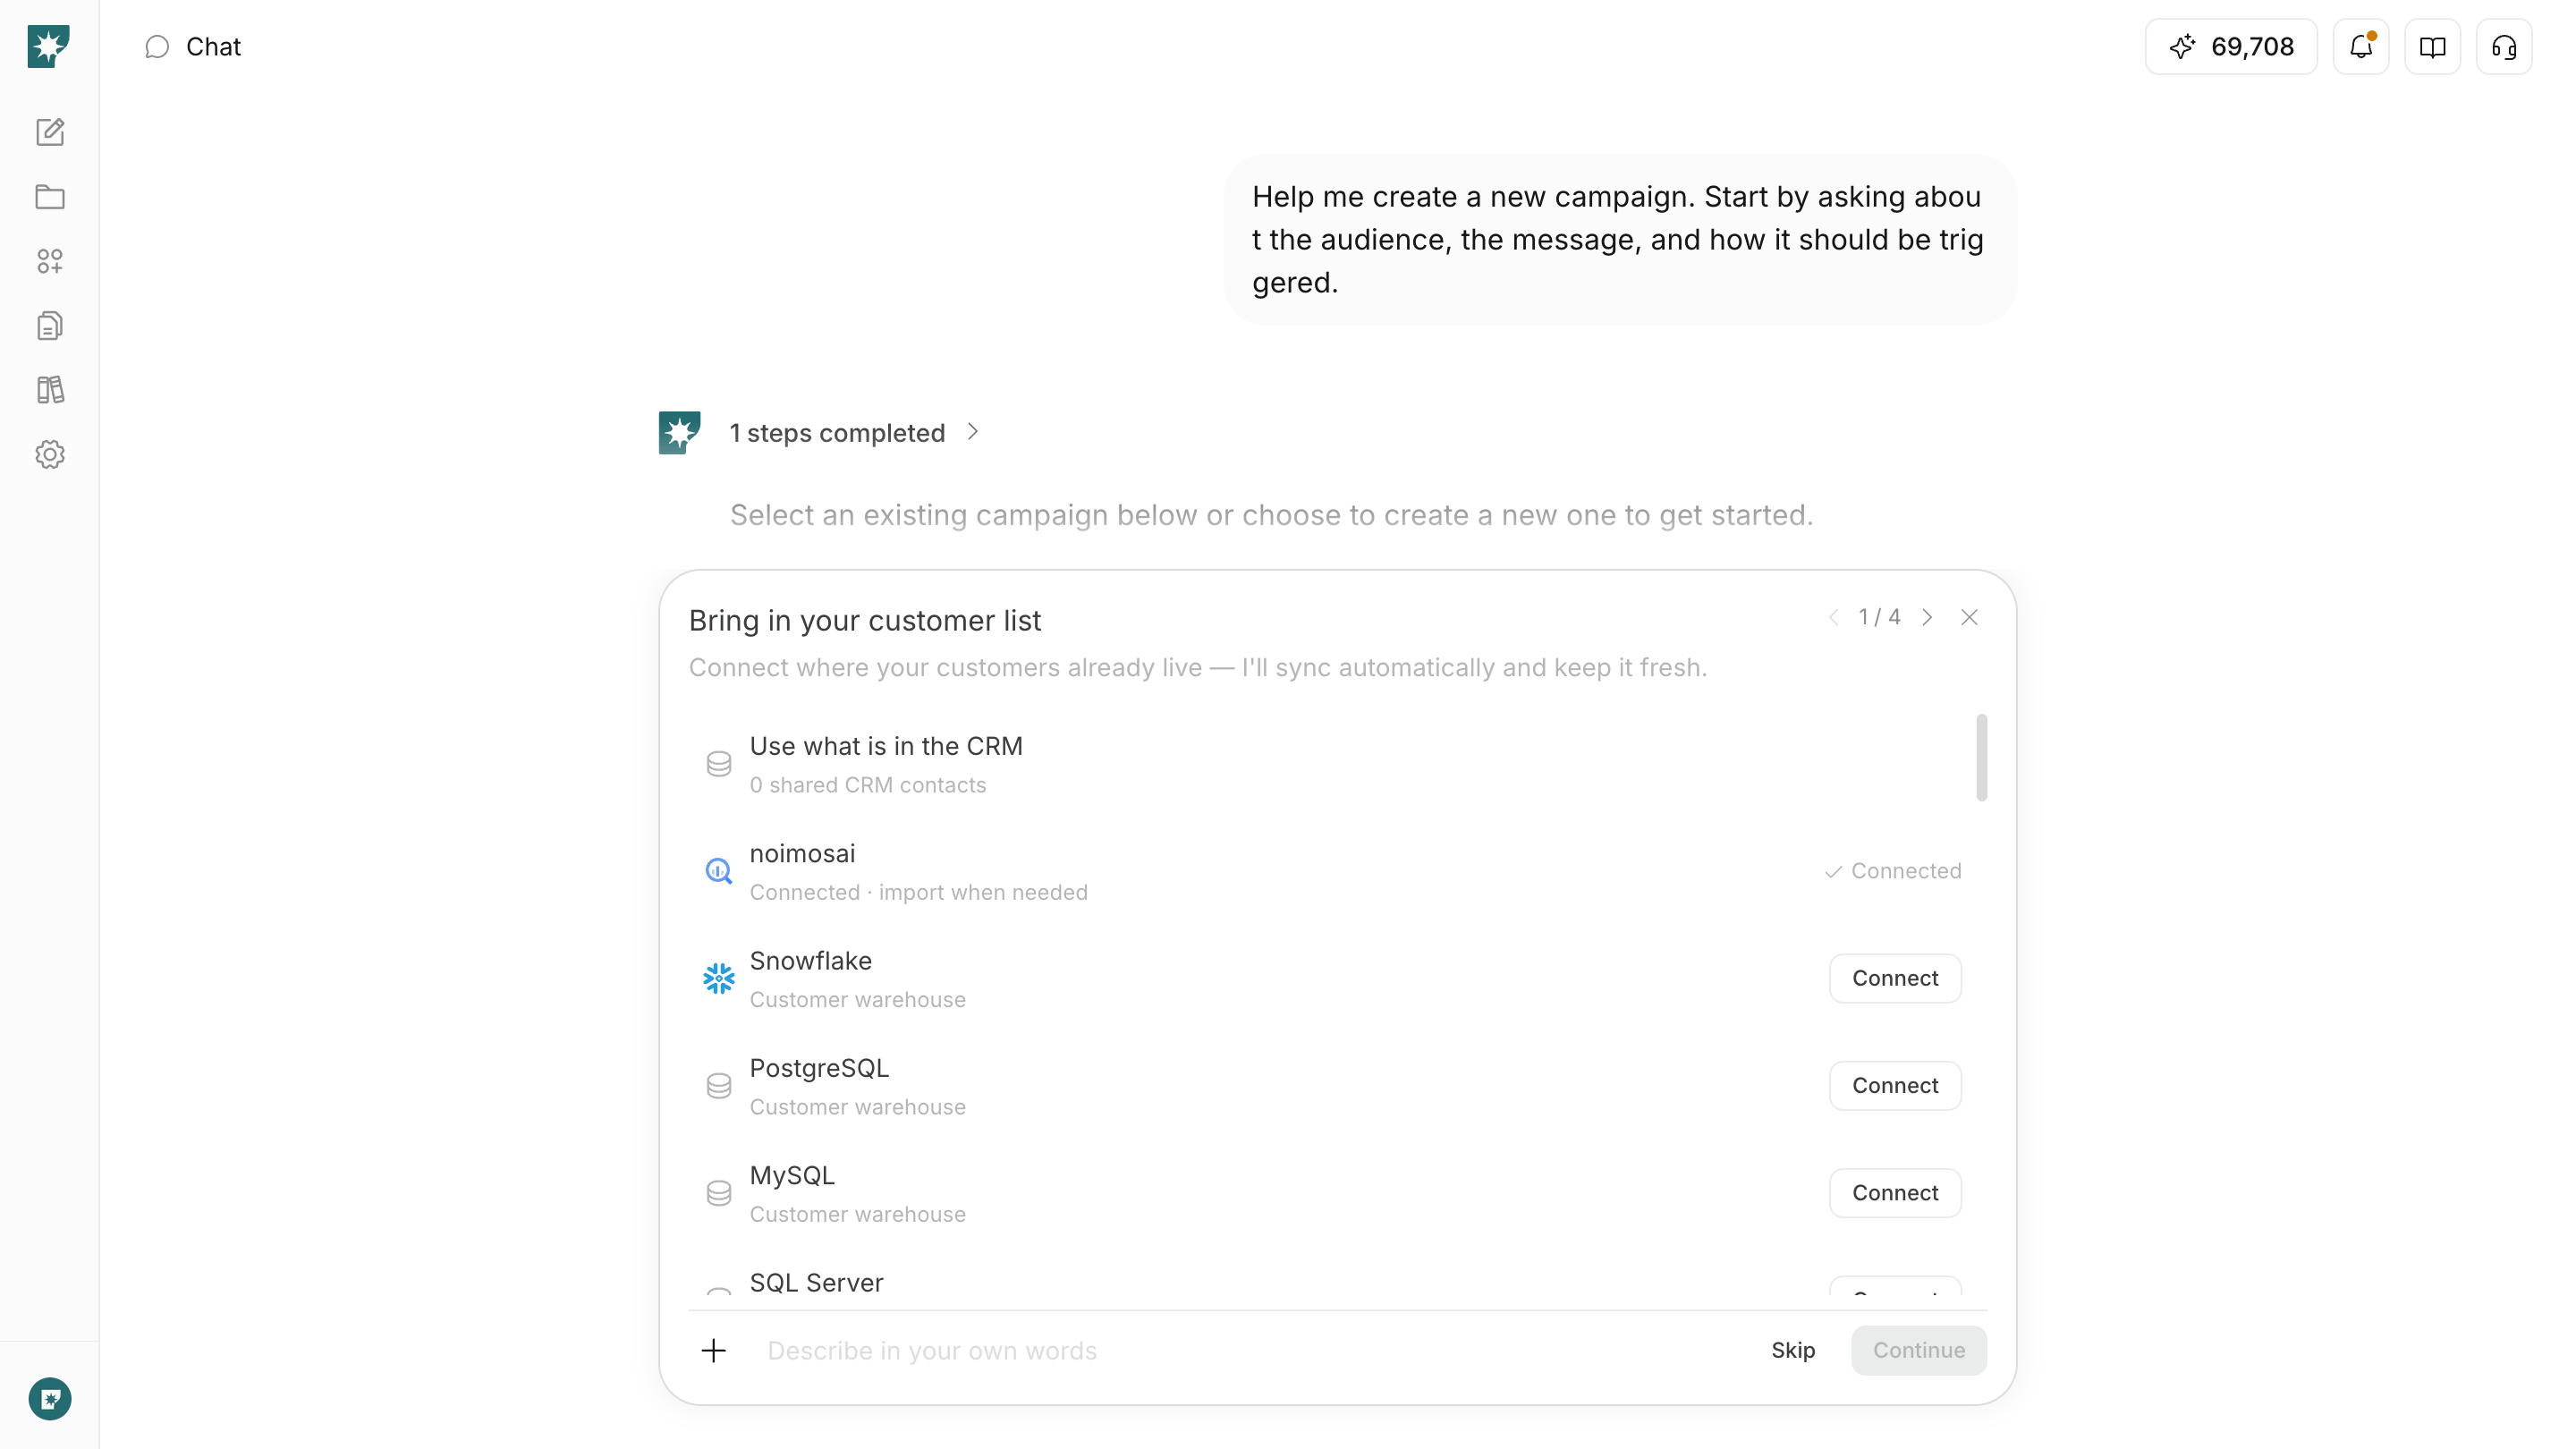
If the customers who should receive messages are not registered yet, import them from where their data is stored.
You can add customer data in the following ways.
* Use customer data already in the workspace.
* Upload a CSV or Excel file.
* Sync from a connected customer management service.
* Import from a connected data warehouse, database, or API.
To add customers after setup, select `Add customer` in `Customers` on the `Customer list` page, then choose where the customer data is stored.
 When you use a CSV or Excel file, keep these two limits in mind.
* You can import up to 10,000 rows of customer data at a time.
* If an Excel file contains multiple sheets, only the first sheet is imported.
If only some rows fail to import, imported customers are still saved. Fix the rows with errors, then import the required data again.
## Group Customers Who Match Conditions in a Segment
Create a segment when you want to deliver a message only to customers who meet certain conditions.
For example, a segment can include the following conditions.
* Customers within 7 days of signing up
* Customers who purchased a specific product
* Customers who have not used the service for a period of time
* Customers in a specific region or on a specific plan
In `Segments & Events` in the campaign canvas, select an existing segment and click `Use` to set it as the campaign audience. If you create a new segment, it becomes the campaign audience.
When you use a CSV or Excel file, keep these two limits in mind.
* You can import up to 10,000 rows of customer data at a time.
* If an Excel file contains multiple sheets, only the first sheet is imported.
If only some rows fail to import, imported customers are still saved. Fix the rows with errors, then import the required data again.
## Group Customers Who Match Conditions in a Segment
Create a segment when you want to deliver a message only to customers who meet certain conditions.
For example, a segment can include the following conditions.
* Customers within 7 days of signing up
* Customers who purchased a specific product
* Customers who have not used the service for a period of time
* Customers in a specific region or on a specific plan
In `Segments & Events` in the campaign canvas, select an existing segment and click `Use` to set it as the campaign audience. If you create a new segment, it becomes the campaign audience.
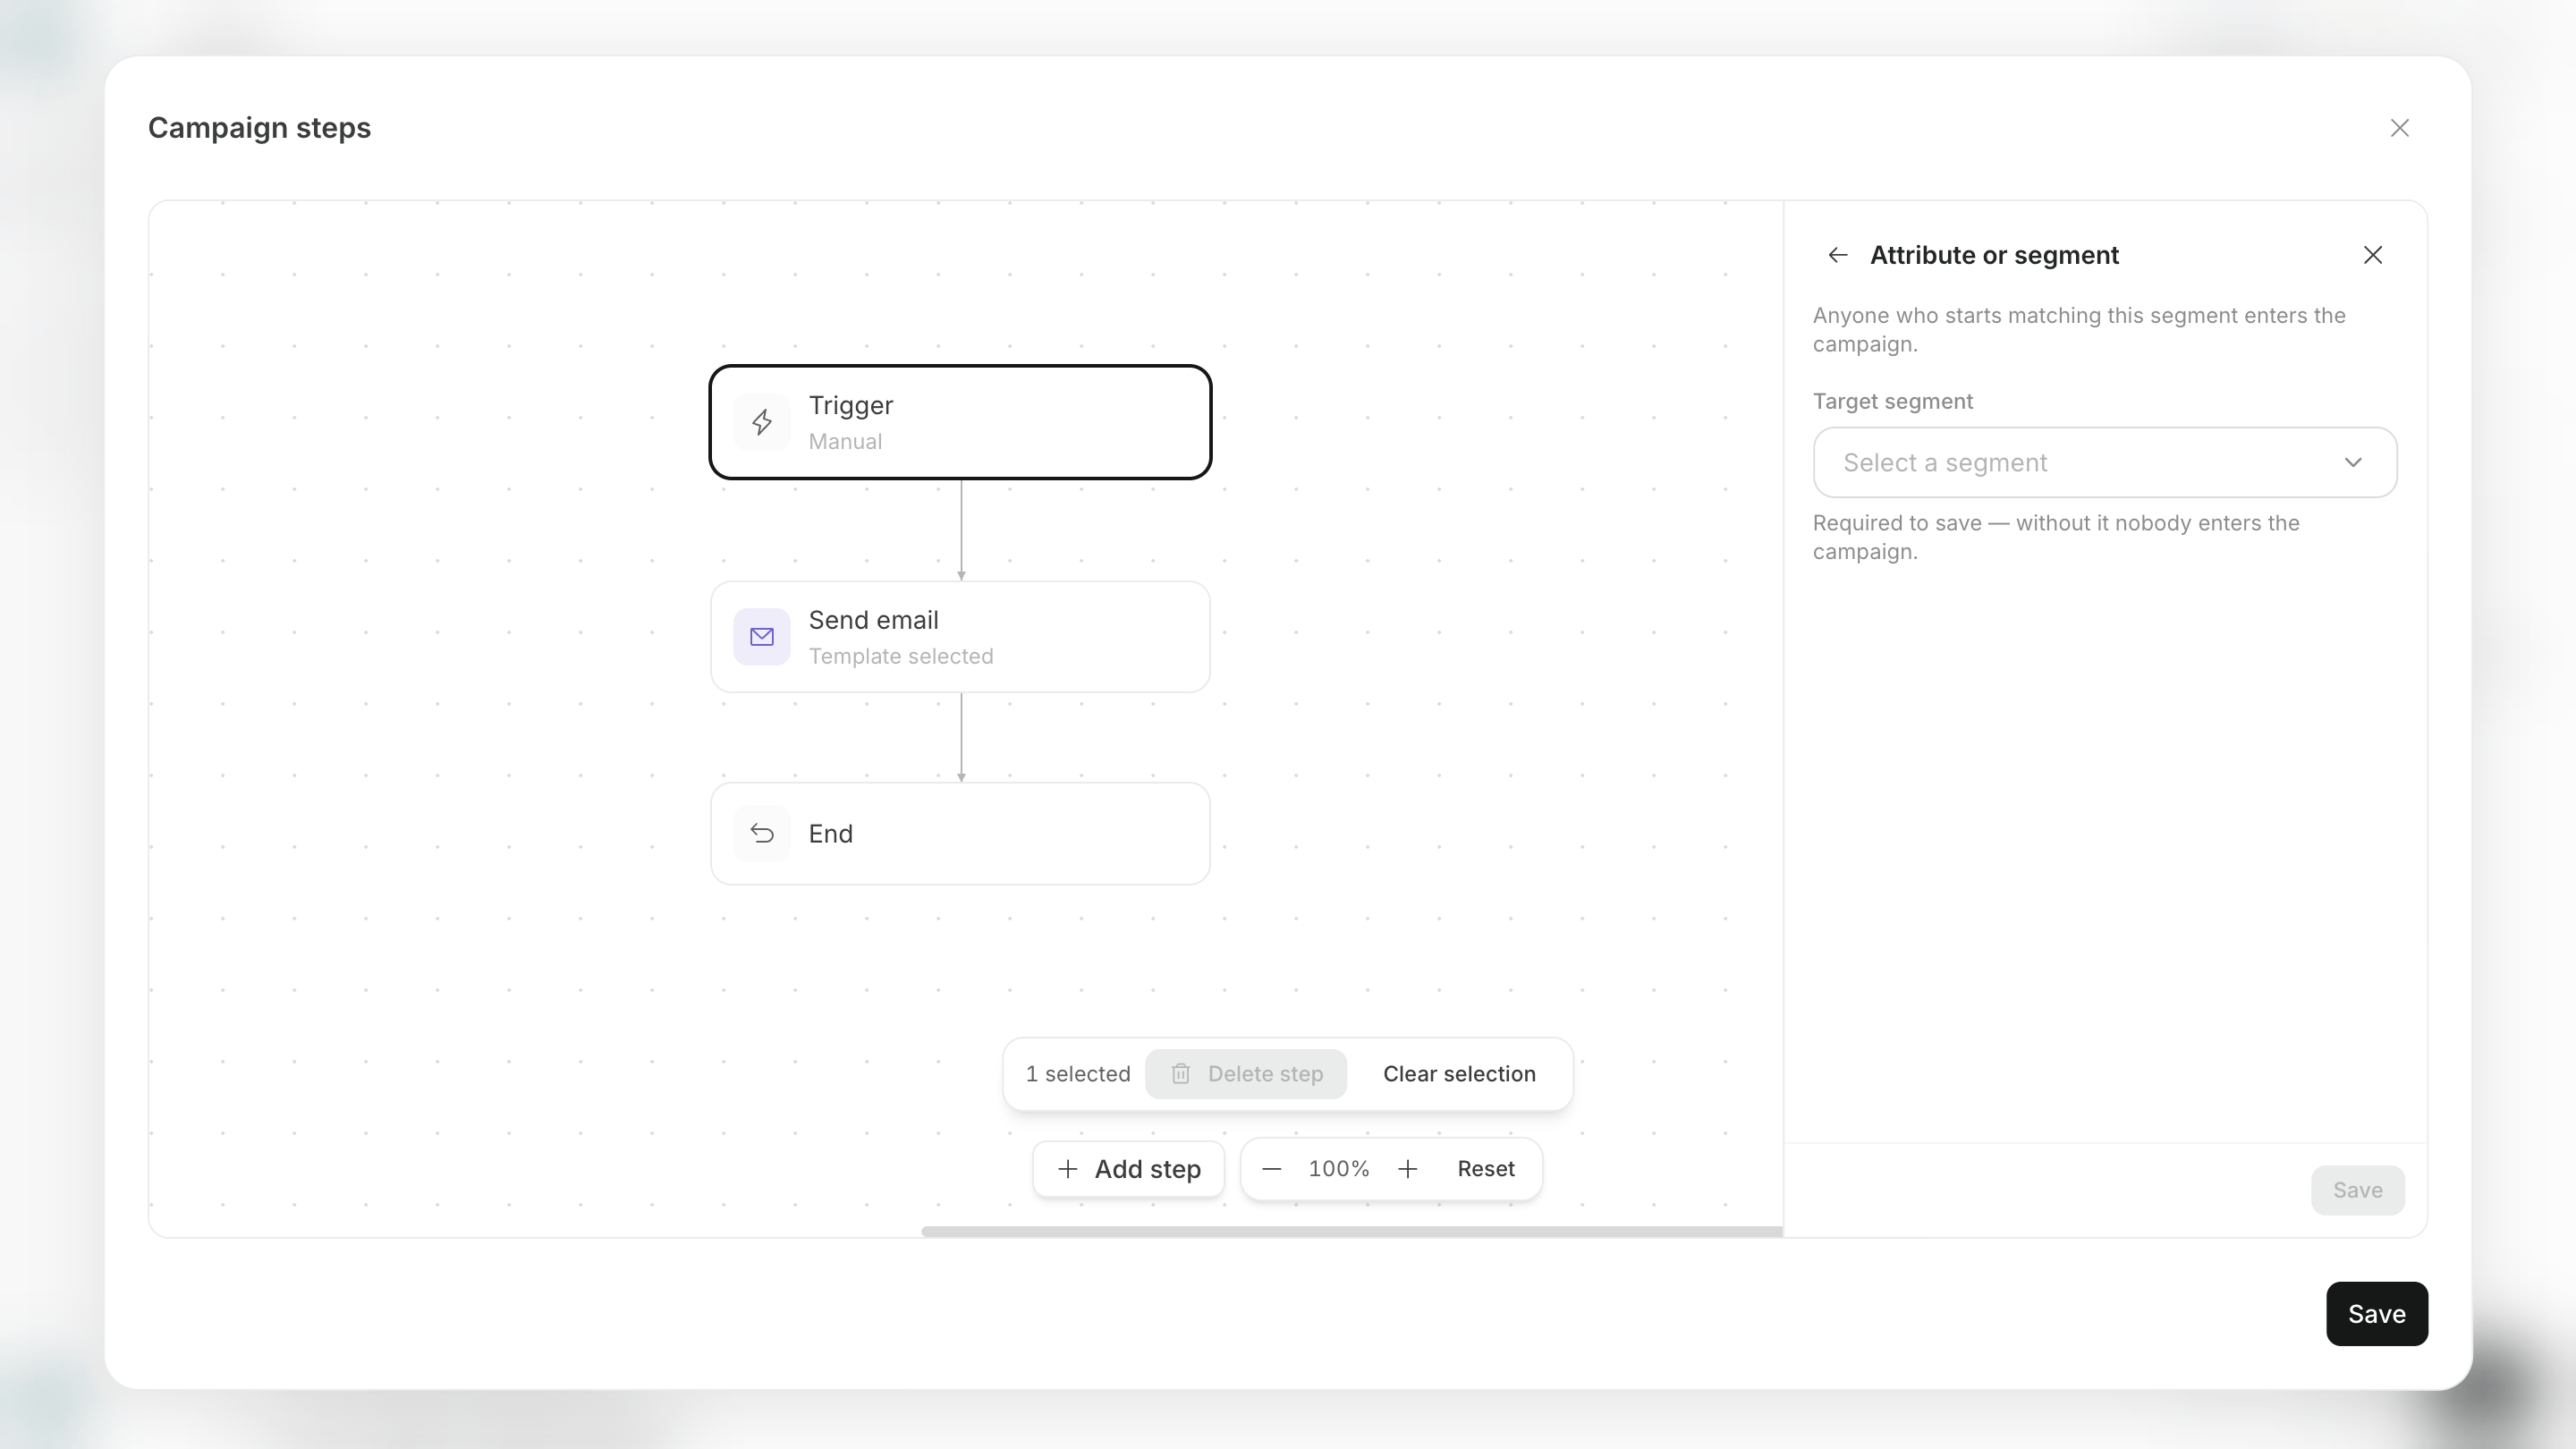 Describe the customer group you want in chat, and the agent creates the segment conditions. When you review and approve that the conditions fit your goal, the segment is created and added to the campaign.
After you create it, you can see the number of customers in the segment and campaigns that use it.
## Record Customer Actions with Events
Create an event when you want to use customer actions, such as sign-ups or purchases, as a campaign entry condition or goal.
You can configure the following information for an event.
* Event name
* A description of when the event occurs
* Additional information recorded with the action, such as product name, amount, or plan
The interface calls this additional information `Properties`. A property can be text, a number, a boolean value, or a date. You can configure up to 50 properties for an event.
Create an event in either of the following ways.
* **Create it in chat:** Describe the action you want to record, then review and approve the event name and properties created by the agent.
* **Create it from the screen:** Enter the event name, description, and properties one by one, then save.
Describe the customer group you want in chat, and the agent creates the segment conditions. When you review and approve that the conditions fit your goal, the segment is created and added to the campaign.
After you create it, you can see the number of customers in the segment and campaigns that use it.
## Record Customer Actions with Events
Create an event when you want to use customer actions, such as sign-ups or purchases, as a campaign entry condition or goal.
You can configure the following information for an event.
* Event name
* A description of when the event occurs
* Additional information recorded with the action, such as product name, amount, or plan
The interface calls this additional information `Properties`. A property can be text, a number, a boolean value, or a date. You can configure up to 50 properties for an event.
Create an event in either of the following ways.
* **Create it in chat:** Describe the action you want to record, then review and approve the event name and properties created by the agent.
* **Create it from the screen:** Enter the event name, description, and properties one by one, then save.
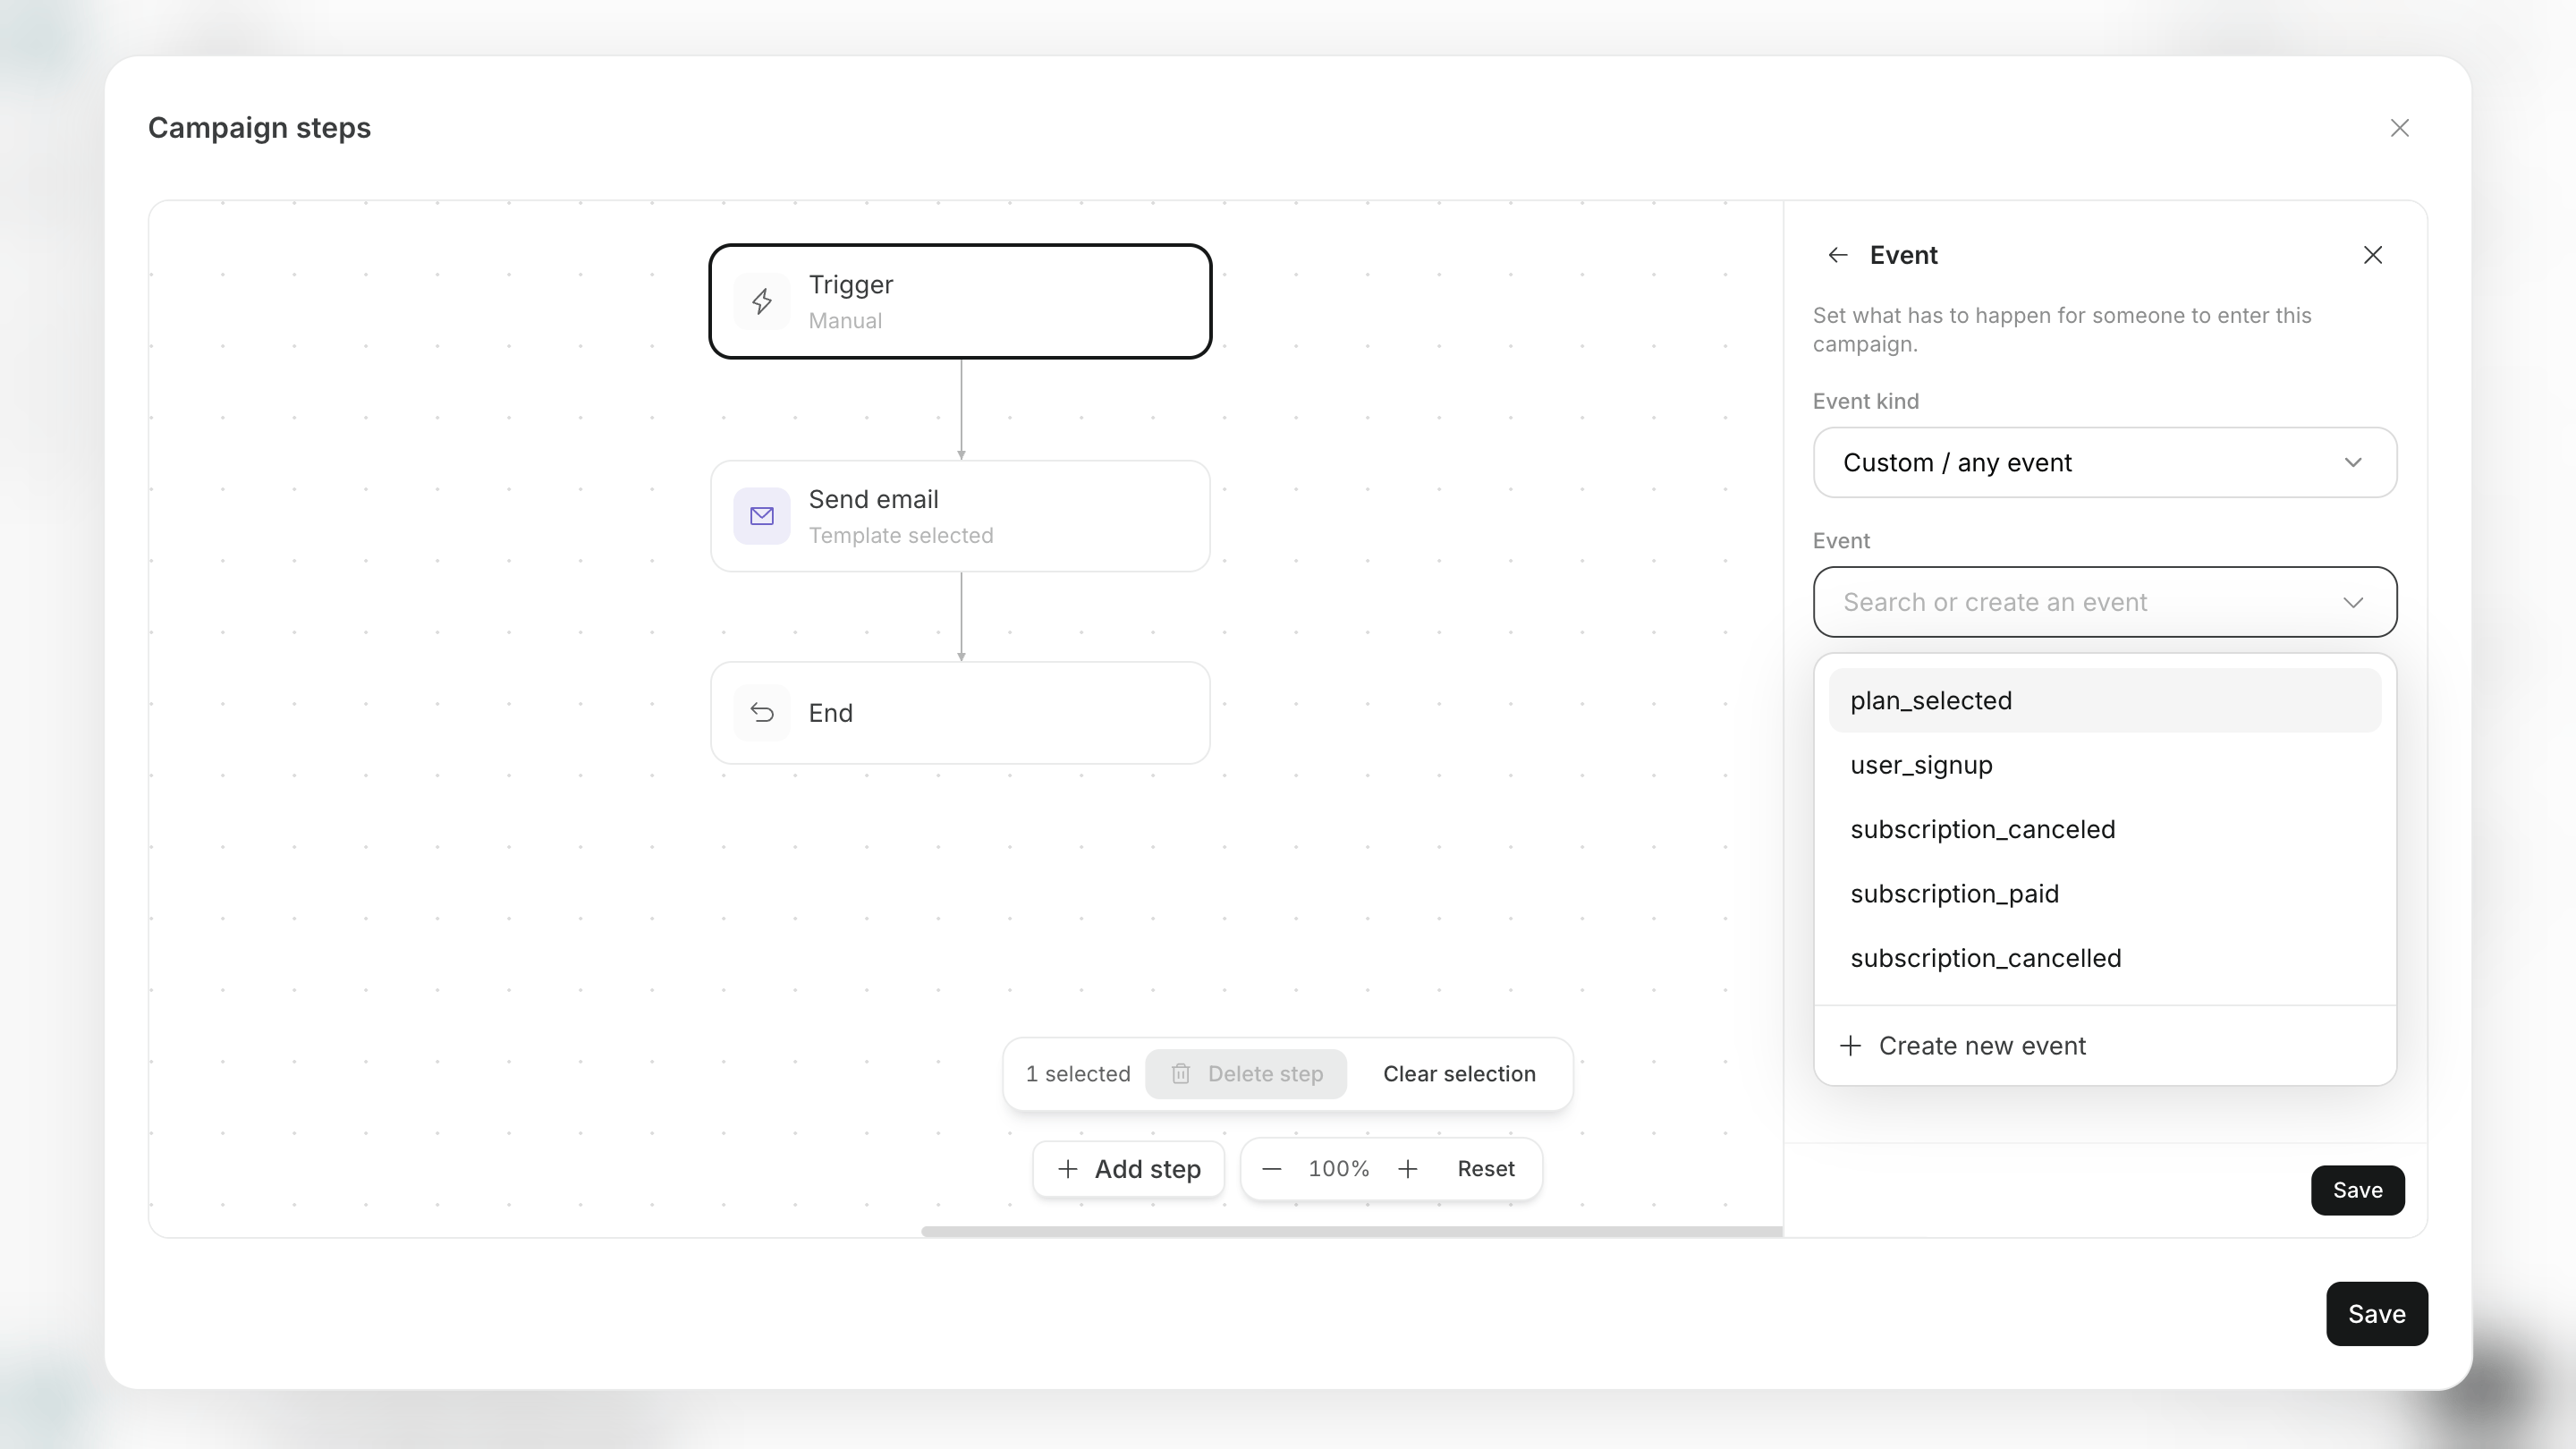 Creating an event alone does not record customer actions. Configure your website or app to send the same event name to NoimosAI when that action occurs.
## View Received Events
When an event you create reaches NoimosAI from your website or app, it is recorded as a customer action.
The event list displays the following information.
* Event name and description
* Additional information recorded with the action
* Number of customers who performed the event
* Most recent received time
* Where the event is used in campaigns
* Code for sending the event from your website or app
Events that have never been received display `Not received yet`. Before you use an event as a trigger or goal, send a test event from your published site or app and update its most recent received time.
To link an event to a specific customer, send information that identifies the customer from your website or app before you send the event. If you send only an event, NoimosAI may not know whose action it was and may not be able to add that customer to the campaign.
## Define the Scope of Customer Data Use
Limit imported customer data to what is needed for the campaign's purpose.
Before importing customer data, review these four points.
* You have the consent and permitted purpose needed to contact the customer.
* Customers who opted out can be excluded.
* Test and production customer data are not mixed.
* You are importing into the correct workspace for the brand, product, or service.
Do not combine customer data from multiple brands in one workspace. Use a separate workspace for each brand, product, or service.
## Related Pages
The following pages explain how to configure event tracking and campaign steps.
* [Customer Engagement Basics](/help-center/ai-team/campaigns/customer-engagement/customer-engagement-basics)
* [Create and Edit Campaign Steps](/help-center/ai-team/campaigns/customer-engagement/create-and-edit-journey)
* [Configure Senders and Event Tracking](/help-center/ai-team/campaigns/customer-engagement/configure-senders-and-event-tracking)
Creating an event alone does not record customer actions. Configure your website or app to send the same event name to NoimosAI when that action occurs.
## View Received Events
When an event you create reaches NoimosAI from your website or app, it is recorded as a customer action.
The event list displays the following information.
* Event name and description
* Additional information recorded with the action
* Number of customers who performed the event
* Most recent received time
* Where the event is used in campaigns
* Code for sending the event from your website or app
Events that have never been received display `Not received yet`. Before you use an event as a trigger or goal, send a test event from your published site or app and update its most recent received time.
To link an event to a specific customer, send information that identifies the customer from your website or app before you send the event. If you send only an event, NoimosAI may not know whose action it was and may not be able to add that customer to the campaign.
## Define the Scope of Customer Data Use
Limit imported customer data to what is needed for the campaign's purpose.
Before importing customer data, review these four points.
* You have the consent and permitted purpose needed to contact the customer.
* Customers who opted out can be excluded.
* Test and production customer data are not mixed.
* You are importing into the correct workspace for the brand, product, or service.
Do not combine customer data from multiple brands in one workspace. Use a separate workspace for each brand, product, or service.
## Related Pages
The following pages explain how to configure event tracking and campaign steps.
* [Customer Engagement Basics](/help-center/ai-team/campaigns/customer-engagement/customer-engagement-basics)
* [Create and Edit Campaign Steps](/help-center/ai-team/campaigns/customer-engagement/create-and-edit-journey)
* [Configure Senders and Event Tracking](/help-center/ai-team/campaigns/customer-engagement/configure-senders-and-event-tracking)